2012年9月7日 星期五

解析 XML - Node.js

這篇文章我們會來解析一份 HTML 文件,因為一份寫得完整的 HTML 就是一份 XML 文件,而 HTML 文件比 XML 文件取得容易,因為網頁的原始碼就是 HTML 文件。不過話說在前頭,有些寫的很差的 HTML 是沒辦法當成 XML 來解析的,雖然 Browser 看得懂,至少要是 一個  Well Formed 的 HTML。通常來說如果不是手寫的,用程式產生出來的 HTML 符合 XML Well Fromed 規則的機會是很高的。那我們就先來看一下,今天要被解析的主角
 
<html>
    <body>
        <table>
            <tr>
                <td>Apples</td>
                <td>44%</td>
            </tr>
            <tr>
                <td>Bananas</td>
                <td>23%</td>
            </tr>
            <tr>
                <td>Oranges</td>
                <td>13%</td>
            </tr>
            <tr>
                <td>Other</td>
                <td>10%</td>
            </tr>
    </body>
</html>
 
把這個檔案命名為 hello.html 存在資料夾中,這份 HTML 執行出來是這樣的結果
不過結果不重要,我們要用 Node.js 來解析它,Node.js 需要一個 module 名為 libxmljs,用 npm install 它,如下
npm install -g libxmljs
然後產生一個新的 js 檔名為 parseXML.js,內容如下
 
var libxmljs = require("libxmljs");
var fs = require('fs');
fs.readFile("hello.html", 'utf8', function(err, data) { 
  if (err) throw err;
  var xmlDoc = libxmljs.parseXmlString(data);
  // xpath queries
  var gchild = xmlDoc.find('//td');
  for (var i = 0; i < gchild.length; i++){
      console.log(gchild[i].text());
  };
});  
一開始需要 libxmljs 這個 module ,接下來還需要 fs 這個 module,然後就用 fs 的 readFile 指定第一個參數就是我們要解析的 hello.html,第二個參數是這個檔案的文字編碼為 utf8 ,第三個參數就是處理從 disk 讀到的 hello.html,放在 data 這個變數裡。
data 被 parseXMLString 這個 function 解析完成之後會把整個 XML 文件架構放在 xmlDoc裡,需要去尋找某一個 tag 的時候,利用 find() 這個 function,裡面的參數是用 XPath 來描述的,在這個例子是 //td,代表的意思就是整份文件裡的 td tag,然後把結果放到 gchild 這個變數。 find() 這個 function 會回傳一個 array 筆者就用 for-loop 把它的結果用 console.log() show
在 Terminal 上面,會看到
Apples
44%
Bananas
23%
Oranges
13%
Other
10%
的結果,是這樣沒錯,寫到這讀者應該會查覺,要找到任一個 tag 就要用 XPath 去描述,有關 XPath 的說明可以參考這邊。接下來我們再試試一個例子。
需求是這樣的。想要找到包含 Apple 這個 tag 之後的第一個 tag 的值。在我們的例子就是想要找到下圖框起來的部分。
我們要這樣想,先找到一個 tag 的值是 Apple ,然後再去找這個 tag 的下一個 tag 的值。這樣的 XPath 寫法會是。
var xpath = '//tr[td = "Apples"]';
 這個寫法的意思是先找到 <td> 的 text 中為 "Apples" 的 <tr>,然後再用 XML Parser 執行,
var tr = xmlDoc.get(xpath);
然後我們用 console.log() 印出來。

 console.log("Up node is : " + tr.text());
 
 console.log("Child nodes : "+tr.childNodes());

這樣會在 Terminal 看到

Up node is : Apples44%
           
Child nodes : <td>Apples</td>,<td>44%</td>,
第一個是用 text(),直接印出,第二個是用 childNodes 其輸出是個 array ,然後被 Node.js 當成 string 就會看到
<td>Apples</td>,<td>44%</td>,
的結果,接著我們可再從 tr.childNodes() 找出我們要的 tag,Apples 是第一個,那下一個就是第二個,就是我們要的,就用
console.log("Next nodes : "+tr.childNodes()[1].text());
就會看到
Next nodes : 44%
不過這個前提是 XML 檔或是 HTML 檔中 tag 和 tag 中沒有其他的文字,比如上方一開始的 HTML 要改成如下,才會解析成功。
<html>
    <body>
        <table>
            <tr><td>Apples</td><td>44%</td>
            </tr>
            <tr>
                <td>Bananas</td>
                <td>23%</td>
            </tr>
            <tr>
                <td>Oranges</td>
                <td>13%</td>
            </tr>
            <tr>
                <td>Other</td>
                <td>10%</td>
            </tr>
        </table>
    </body>
</html>
筆者刻意把看到第一個 <tr> 和 <td> 中間沒有任何的空間,也許這樣對人眼是不好看的,但是它還是一個合法的 XML 而且更適合解析。
今天解析 XML 就到這,咱們下次見,檔案一樣放在 GitHub

2012年9月2日 星期日

Hosting Service - Node.js

寫 Web 的服務,筆者是覺得總會經過利用別人的 Hosting Service 這個過程。Web Service 最麻煩的就是管理和擴增服務,有許多流量和後台的程式要處理,對Node.js 來說其標榜就是可以很簡單地分散式處理,而管理的部分交由第三方的平台來管理對中小型服務來說是一個非常好的起點。
今天要介紹一個不錯的,Node.js Hosting 的服務,名為 Nodejitsu。這個 Repository 好用的地方是設定簡單,支援的 Module 也不少,對於 iOS Developer 來說,最重要的 Server 服務之一就是 APNS 了,筆者測試過,是可以成功執行沒有擋掉 APNS 需要的 Port。
好那我們就登入 Nodejitsu 的首面看到下面的頁面,Try Nodejitsu for free.
接下來會有幾個步驟需要填寫,如下,填寫 useranme 只允許字母數字和-

寫 e-mail address
填寫你想要建立的 Node.j 服務的類型和任何其他在使用的技術,也可以不寫。
好了之後應該會在 mail 收到 Nodejitsu 寄來的信,類似下方。
信用還提到第一次啟用帳號要做的事情如下

在終端機執行下列指令,
  1. sudo npm install jitsu -g
  2. jitsu users confirm <帳號> <認證碼>
這樣就可以了,實際情況如下,步驟 2,執行後會問一些問題,第一個是設定密碼
設定完之後,再輸入一次,就啟用完成,如下
接下我們就要放一個簡單的 web server 到 Nodejitsu 上面去。
先用 mkdir ( make directory ) 在任一目錄下建立一個新的目錄如下
mkdir myJitsu
 然後進入用 cd myJitsu 如下
我們新增 Node.js 學習資源這篇提到的 hello.js ,到這個資料夾下,也取名為 hello.js
var http = require('http');
 
http.createServer(function (request, response) {
    response.writeHead(200, {'Content-Type': 'text/plain'});
    response.end('Hello World\n');
}).listen(8000);
然後執行佈署的指令,如下
jitsu deploy
接著會看到 jitsu 和 Server 溝通,會再問一些問題,第一個是 App Name: 在其後有一個 (myJitsu) 的意思是,如果不寫,就用這個名字,我們來改一下,用 MyJitsu
再來是 subdomain 的名稱,這個不改也 ok
接下來比較重要,是一開始要執行的 script,也就是 hello.js,如下設定

再來設定版本,我們設定為 0.0.1,如下
 最後是需要的 Node.js 版本,這個例子為 0.8.x
完成後,會提醒我們做確認的動作,並把剛剛的設定都寫入一個 package.json 的檔案中,
寫 yes 之後,就會看到這樣的裝態,就是完成了

上圖用白色框起來的部分,就是這個服務的網址,試著在Browser 的網址中輸入
http://incensome.myjitsu.jit.su/
就會看到如下
 然後我們回到 http://nodejitsu.com/ 來看一下剛剛佈署到 Nodejitsu 的服務,如下,按右上的 Login。
輸入帳號密碼之後,就會看到如下
一個上線的服務完成了,重點是右邊視窗有一個 Log 的 Tab,點選後如下
這裡可以看到在程式中 console.log 的結果,雖然目前我們並沒有用到 console.log。
接下來我們要來看一下這個檔案 package.json
{
  "name": "MyJitsu",
  "subdomain": "incensome.myJitsu",
  "scripts": {
    "start": "hello.js"
  },
  "version": "0.0.1",
  "engines": {
    "node": "0.8.x"
  }
}
這個檔案描述這個 Node.js 服務的設定,這個例子只用到 http 的 module,如果用到其他的,不是包在 Node.js 核心的東西,比如這篇提到的 Express,就會看到如下的 package.json
{
  "name": "TeachRepo",
  "subdomain": "incensome.teachrepo",
  "scripts": {
    "start": "web.js"
  },
  "version": "0.0.1-3",
  "engines": {
    "node": "0.8.x"
  },
  "dependencies": {
    "express": "*"
  }
}
jitsu 會自行去看 *.js 檔然後把 dependencies 加到 package.json 上,在上面的例子是寫,
"dependencies": {
    "express": "*"
  }
代表會用到 express 而不拘版本,(其實,3.0 和 2.0 有差別,有注意一下)。
那如果 hello.js 有更新怎麼辦?在同一個目錄下,用 jitsu deploy 就可以了,jitsu 會自動把版號加上-1,比如原本是 0.0.1 會變成 0.0.1-1。

最後我們來討論一下,Nodejitsu 這個服務,付費的時候怎麼計算?
從這個網頁我們可以看到,個人,或是小型公司來說 一個 drone 一個月只要 $3 美金,是相當便宜。如下是Individual Plan
那什麼是 Drone 呢?在這 FAQ 有提到,就是指處理 App 的能力,當然它有提到通常一個 App 就只會需要一個 drone,同理可推是一個 App。同時平行處理的話也許會需要比較多 drone, 不過 Node.js 本身就是 None-blocking,比較不需要自行再產生 Thread 之類的,但真正計算的方法,也只能靠經驗法則了。
那試用版的可以用多久呢? FAQ 有提到,現在是 3 個月,過期怎麼辦?再申請一個 e-mail 就好了 orz..
好,那咱們就下次見。

2012年8月29日 星期三

iOS - 下載 Zip File 並解壓縮

今天要來介紹一個方法,讓 iOS App 可以解開 Zip File,這樣一來 Server 端要給 iOS App 的文件就可以打包成比較小的 size ,而且可以減少 Server 傳資料到 iOS App 的時間。首先要準備好一個 Zip 檔和 Server 端的程式,可以參考這篇文章,把 mime type 改成 application/zip 就可以了。如下的設定

fs.stat(filename, function(error, stat) {
      if (error) { throw error; }
          res.writeHead(200, {
            'Content-Type' : 'application/zip',
            'Content-Length' : stat.size
          });
 });
Node.js 檔和 iOS 專案筆者放在 GitHub/iOS_unzip

接下來就是 iOS 的部分了,筆者採用的 Zip/Unzip 套件為 ZipArchive 提供的第三方套件。下載後會看到如下的資料夾內容。


接下來開啟 Single View Application。如下,命名為 UnzipDemo
把 ZipArchive 的檔案全加到 UnzipDemo 裡。如下
在 ZipArchive 的文件有提到,要在存案加入 libz.dylib。如下

加入之後會看到如下圖,才是正確的
加入之後,我們立馬 Compile 執行看看,卻看到如下的 Error
 

原來是 ZipArchive 這個專案有用到 dealloc 等 ARC 開啟時不允許的關鍵字,因為引入的檔案不多,直接把某幾個 file 設定會不支援 ARC 就好了,如下設定。

現在 Compile 就可以成功執行了。
接者來看到功能面,新增一個 UIButton 和連結一個  IBAction 如下圖
在 ViewController.m 新增如下程式碼,先來把 Server 的 developer.zip 下載到 Mac 某個資料夾。在這邊的例子,是用 GET 連結 http://127.0.0.1:8800/data?fileName=developer.zip 然後存到 /Users/chronoer/developer/developer.zip ,先做這樣的測試。

#define SERVER @"http://127.0.0.1:8800/data"
@interface ViewController (){
    NSString * fileName;
   
}
@property (strong) NSMutableData * tmpData;
@end

@implementation ViewController
@synthesize tmpData;
- (IBAction)downZip:(id)sender {
   fileName = @"developer.zip";     NSURL * fileURL = [NSURL URLWithString:[SERVER stringByAppendingFormat:@"?fileName=%@", fileName]];         NSURLRequest * urlRequest = [NSURLRequest requestWithURL:fileURL];     [NSURLConnection connectionWithRequest:urlRequest delegate:self]; } -(void) connection:(NSURLConnection *)connection didReceiveData:(NSData *)data{     [self.tmpData appendData:data]; } -(void) connectionDidFinishLoading:(NSURLConnection *)connection{ NSString * filePath = [[self fakeDoc] stringByAppendingFormat:@"/%@"fileName]; [[NSFileManager defaultManager] createFileAtPath:filePath contents:self.tmpData attributes:nil]; } -(NSString *) fakeDoc{ return @"/Users/chronoer/developer"; }
首先有一個 ivar fileName 用來設定要抓取的 zip 檔名,還有一個 tmpData,要去收集從 Server 來的 binary 的片段。在 downZip: 這個 IBAction 我們看到用 NSURLConnection 去連結 http://127.0.0.1:8800/data?fileName=developer.zip 然後指定 delegate 為 self,所以接下來至少要實作
 
-(void) connection:(NSURLConnection *)connection didReceiveData:(NSData *)data{
    [self.tmpData appendData:data];
}
 
-(void) connectionDidFinishLoading:(NSURLConnection *)connection{
    NSString * filePath = [[self fakeDoc] stringByAppendingFormat:@"/%@", fileName];
    [[NSFileManager defaultManager] createFileAtPath:filePath contents:self.tmpData attributes:nil]; 
}
這兩個 delegate method。其中

[self.tmpData appendData:data];
就是把每個 zip file 小片斷收集到 tmpData而整個檔案都收集完整就會呼叫 connectionDidFinishLoading: ,如下我們就把 self.tmpData 的完整資料存在 /Users/chronoer/developer/developer.zip。

  NSString * filePath = [[self fakeDoc] stringByAppendingFormat:@"/%@", fileName];
[[NSFileManager defaultManager] createFileAtPath:filePath contents:self.tmpData attributes:nil];
developer.zip 要預先放在 server 的資料夾,然後 /Users/chronoer/developer 這個目錄也要存在。
最後就是 unzip 的部分了,在 ViewController.m import 如下

#import "ZipArchive.h" 
 然後新增一個 method 為 unzipFile

-(void) unzipFile:(NSString * ) zipFilePath{
    ZipArchive *zipArchive = [[ZipArchive alloc] init];
    [zipArchive UnzipOpenFile:zipFilePath ];
    [zipArchive UnzipFileTo:[self fakeDoc] overWrite:YES];
    [zipArchive UnzipCloseFile]; }
非常單純的 4 個步驟,先 alloc ZipArchive 的物件,然後指定要開啟的 zip 檔,用

[zipArchive UnzipOpenFile:zipFilePath ];
再來就是把這個 zip 檔解壓縮到指定的目錄底下,並設定為 overWrite

[zipArchive UnzipFileTo:[self fakeDoc] overWrite:YES];
結束就是關掉和這個 zip 相關連結,

[zipArchive UnzipCloseFile];
好啦,今天教學到這,咱們下次見。

2012年8月26日 星期日

上下傳 file 範例 - Node.js

一開始先要用 express 來產生 client 端上傳的 html form。如下。
var express = require('express');

var app = express( );
app.configure(function() {
        app.use(express.bodyParser({uploadDir: './'}));
});
app.listen(8800);

app.get('/upload', function(req, res) {
    res.write('<html><body><form method="post" enctype="multipart/form-data" action="/fileUpload">'
    +'<input type="file" name="uploadingFile"><br>'
    +'<input type="submit">'
    +'</form></body></html>');
    res.end();
});
// 將檔案命名為 fileServer.js
如此一來,可以用 Browser 打開 http://127.0.0.1:8800/upload 這樣一來就是執行上方的程式碼
app.get('/upload', function(req, res) {
    res.write('<html><body><form method="post" enctype="multipart/form-data" action="/fileUpload">'
    +'<input type="file" name="uploadingFile"><br>'
    +'<input type="submit">'
    +'</form></body></html>');
    res.end();
});
也就是回傳一個 HTML 的內容給 Browser
<html>
<body>
     <form method="post" enctype="multipart/form-data" action="/fileUpload">
         <input type="file" name="uploadingFile"><br>
         <input type="submit"> 
    </form>
</body>
</html>
 在 Firefox 上面會看到
這個 submit 按下去之後會去連結 /fileUpload 這個路徑,所以接下來就是要來處理這個 post method。在 fileServer.js 加入以下程式碼
var fs = require('fs');
app.post('/fileUpload', function(req, res) {

    var uploadedFile = req.files.uploadingFile;
        var tmpPath = uploadedFile.path;
        var targetPath = './' + uploadedFile.name;

        fs.rename(tmpPath, targetPath, function(err) {
            if (err) throw err;
               fs.unlink(tmpPath, function() {
                  
                   console.log('File Uploaded to ' + targetPath + ' - ' + uploadedFile.size + ' bytes');
            });
        });
    res.send('file upload is done.');
    res.end();
});
在這我們會用到檔案處理,所以要require('fs')
對於上傳檔案來說,express 會用 req.files 來暫存有關上傳檔案的資訊,在這個例子中會看到如下的訊息
{ uploadingFile:
   { size: 15198,
     path: '7fedaa5a4b44a499e2cfd29fc7c3be71',
     name: 'object.png',
     type: 'image/png',
     hash: false,
     lastModifiedDate: Mon Aug 27 2012 09:06:45 GMT+0800 (CST),
     _writeStream:
      { path: '7fedaa5a4b44a499e2cfd29fc7c3be71',
        fd: 10,
        writable: false,
        flags: 'w',
        encoding: 'binary',
        mode: 438,
        bytesWritten: 15198,
        busy: false,
        _queue: [],
        _open: [Function],
        drainable: true },
     length: [Getter],
     filename: [Getter],
     mime: [Getter]
    }
}
在這個 json 物件裡,第一個出現的 key 是 uploadingFile 也就是寫在 client form 的
<html>
<body>
     <form method="post" enctype="multipart/form-data" action="/fileUpload">
         <input type="file" name="uploadingFile"><br>
         <input type="submit"> 
    </form>
</body>
</html> 
上方的 name 之後的值,接著比較重要的是 express 會把收到的 file 放在一個暫存的路徑,寫在 req.files 中的 path 之後,為
path: '7fedaa5a4b44a499e2cfd29fc7c3be71',
我們接著看 fileServer.js 裡的程式碼
var uploadedFile = req.files.uploadingFile;
var tmpPath = uploadedFile.path;
var targetPath = './' + uploadedFile.name;
由 uploadingFile.path 取到的是 tmp 的資料夾,把這裡的東西搬到 targetPath 這裡。前提是 express 要做一個設定
var app = express( );
app.configure(function() {
        app.use(express.bodyParser({uploadDir: './'}));

});
app.listen(8800);
設定 body 中 uploadDir 的真實路徑。
fs.rename(tmpPath, targetPath, function(err) {
        if (err) throw err;
               fs.unlink(tmpPath, function() {
                  
               console.log('File Uploaded to ' + targetPath + ' - ' + uploadedFile.size + ' bytes');
        });
});
利用 fs.rename 把在 tmp 路徑的上傳檔案移到 targetPath 中。最後用 unlink 移除 在 tmpPath 裡的檔案。這樣上傳的 post 就處理完成了。可以上傳看看,會放在和 fileServer.js 同一個目錄。
再來處理下載的部分,新增程式碼在 fileServer.js

app.get('/data', function(req,res) {
    if (req.query.fileName) {
       
        var filename = req.query.fileName;
        console.log(filename);
   
        var mimeType = "image/png";
        res.writeHead(200, mimeType);

        var fileStream = fs.createReadStream(filename);
        fileStream.on('data', function (data) {
            res.write(data);
        });
        fileStream.on('end', function() {
            res.end();
        });
       
    }else{
        res.writeHead(404,{"Content-Type": "application/zip"});
        res.write("error");
        res.end();
    }
});

下載的部分打算用 get 來完成,如果使用者在 Browser 下達
http://127.0.0.1:8800/data?fileName=object.png
就是準備要下載 object.png 這個檔案,所以一開始用
if(req.query.fileName)
來確定有指定 file name

var mimeType = "image/png";
res.writeHead(200, mimeType);
 來和 Browser 說接下來要傳的是一個 png 檔
        var fileStream = fs.createReadStream(filename);
        fileStream.on('data', function (data) {
            res.write(data);
        });
        fileStream.on('end', function() {
            res.end();
        });
上方的部分是開始一個 write stream,然後在 data 的狀態下,利用 res.write() 把資料寫給 Browser。在 end 的時候結束和 browser 的通訊。
在 Server 的部分通常會先和 Client 說 Client 想下載的檔案大小如何,請如下指定
fs.stat(filename, function(error, stat) {
      if (error) { throw error; }
          res.writeHead(200, {
            'Content-Type' : 'image/png',
            'Content-Length' : stat.size
      });
});
其中 filename 指的是 request 想要下載的檔案路徑。
如此一來,下載的部分也完成了。一樣,程式碼放在 GitHub

2012年8月22日 星期三

用 Node.js 完成 Apple Push Notification Service - node-apn

iOS 服務中 Push Notification 是一個很常被使用者的服務,使用者 Push Notification 可以主動通知使用者關於這個 App 的消息,使用者不用打開 App 就可以被通知有什麼消息。
要建立這項服務,開發者必需要有 Server Side Programming 的能力,而 Node.js 可以把學習曲線降到最底,讓我們來看看它神奇的地方。
首先安裝一個叫 node-apn 的 package。老方法用 npm
npm install -g node-apn
npm install -g apn

這樣就安裝好了。程式碼有多簡單呢?

var apns = require('apn');
var options = {
    cert: 'cert.pem',                 /* Certificate file path */
    key:  'key.pem',                  /* Key file path */
    gateway: 'gateway.sandbox.push.apple.com',/* gateway address */
    port: 2195,                       /* gateway port */
    errorCallback: errorHappened ,    /* Callback when error occurs function(err,notification) */
}; 
function errorHappened(err, notification){
    console.log("err " + err);
}
var apnsConnection = new apns.Connection(options);

var token = "xxxx;oiqwjf;oiwje;foiajw;f";
var myDevice = new apns.Device(token);
var note = new apns.Notification();
note.expiry = Math.floor(Date.now() / 1000) + 3600; // Expires 1 hour from now.
note.badge = 1;
note.sound = "ping.aiff";
note.alert = "You have a new message";
note.payload = {'messageFrom': 'Caroline'};
note.device = myDevice;

apnsConnection.sendNotification(note);
// 名為 apnServer.js
就這樣不到 30 行,更詳細的文件可以參考這裡 node-apn,就可以從任意可以執行 Node.js 的電腦送訊息給 iOS 的 App。
其中有一些準備動作第一次要完成,比如 cert 和 key 的 file ,從 Apple iOS Portal Download 下來之後,要自行轉檔才可以得到,再來就是 token 某個 iOS App 會去 Apple 某一個 token ,代表著這個 App ,Push Notification 要和這個 Token 綁在一起,當這個 Push Notification 到達手機時,iOS 系統才會知道要送給那一個 App。
我們從上方一步一步來看,首先看到

var apns = require('apn');
var options = {
    cert: 'cert.pem',                 /* Certificate file path */
    key:  'key.pem',                  /* Key file path */
    gateway: 'gateway.sandbox.push.apple.com',/* gateway address */
    port: 2195,                       /* gateway port */
    errorCallback: errorHappened ,    /* Callback when error occurs function(err,notification) */
}; 
function errorHappened(err, notification){
    console.log("err " + err);
}

var apnsConnection = new apns.Connection(options);
一開始就使用 apn 這個 library,然後設定一些 options,比如 cert 和 key 檔的路徑檔名,再來就是測試用的 Apple 主機 -  gateway.sandbox.push.apple.com 和 port。要注意的是現在這個主機是測試用的,正式上線要改用 gateway.push.apple.com ,再來準備一個 errorCallBack 的 function,當這個連線有問題時,我可以從 errorHappend 得知錯誤情況。最後是新建一個 connection 然後指定到 apnsConnection。
解說到這先停一下,看要如何來產生 cert.pem 和 key.pem 這兩個 file.
進入 iOS Developer Portal 的時候先選到某一個 App IDs 的 Configure. 如下圖
接著要把 Enable Apple Push Notification Service 的
底下有兩個一個是 Development 另一個是 Production 。圖上是把 Development 點選 Configure 上傳自己的 Certification Request 然後得到 Developer Portal 的 Provisioning Profile 了。就會有一個下載的按鈕,上傳的步驟就和一開始要得到 Developer Provisioning Profile 一樣,就不多說了,下載之後會在 Keychain Access 出現以下畫面。
一個一個產生,在 Certificates 上面(也就是紅色外框圖示)按右鍵,選 export,如下圖
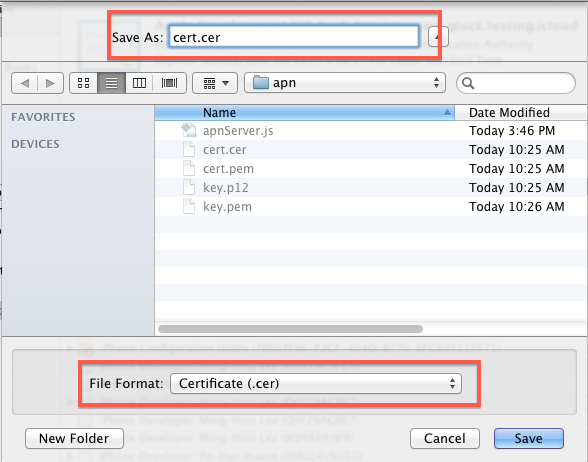
File Format 選 Certificate,然後命名為 cert.cer,存到 apnServer.js file 的路徑。如下
同樣方法,按右鍵 export <key> 如下
這次的 format 選 .p12 如下圖,命名為 key.p12,和剛剛的 cert.cer 同一個資料夾
用 Terminal 在這兩個檔案的目錄下,依序輸入這兩行指令。
$ openssl x509 -in cert.cer -inform DER -outform PEM -out cert.pem
$ openssl pkcs12 -in key.p12 -out key.pem -nodes
這樣一個 key.pem 和 cert.pem 都準備好了。回到 apnServer.js 看看

var token = "xxxx;oiqwjf;oiwje;foiajw;f";
var myDevice = new apns.Device(token);
var note = new apns.Notification();
note.expiry = Math.floor(Date.now() / 1000) + 3600; // Expires 1 hour from now.
note.badge = 1;
note.sound = "ping.aiff";
note.alert = "You have a new message";
note.payload = {'messageFrom': 'Caroline'};
note.device = myDevice;

apnsConnection.sendNotification(note);
之前建立了一個 connection 物件,接著就看到一個奇怪的 token 變數,後面的字串是來亂的,這個 token 就是要從 iOS App 去和 Apple 連絡,得到的字串,等一下會看到 iOS 程式的寫法。接著利用這個 token 產生一個要傳送 notification 的 myDevice。跟著利用 apns 產生 notification,設定 expiration time 還有 badge, sound,alert 字樣,json 格式的 payload 可以傳給 App。最後把 note 和 device 綁定,然後就 sendNotification(note)。App 就會收到 notification 了。在這樣要注意的是,notification 並不一定會被送到,這是 Apple 文件寫的很明白的地方,所以重要的資料還是要 App 主動去和 Server 要,千萬不要依賴 Push Notification 傳資料。
最後我們來看一下 iOS App 怎麼取得專屬於自己的 token?
在任何的 App Source 的 AppDelegate.m 裡如下新增。

- (BOOL)application:(UIApplication *)application didFinishLaunchingWithOptions:(NSDictionary *)launchOptions{
    [application registerForRemoteNotificationTypes:
     UIRemoteNotificationTypeAlert | UIRemoteNotificationTypeBadge | UIRemoteNotificationTypeSound]; 
    self.window.backgroundColor = [UIColor whiteColor];
    [self.window makeKeyAndVisible];
    return YES;
}

- (void)application:(UIApplication *)application didRegisterForRemoteNotificationsWithDeviceToken:(NSData *)deviceToken {
    NSString * tempToken = [deviceToken description];
    self.token = [tempToken stringByReplacingOccurrencesOfString:@"<" withString:@""];
    self.token = [self.token stringByReplacingOccurrencesOfString:@">" withString:@""];
    self.token = [[self.token componentsSeparatedByString:@" "] componentsJoinedByString:@"" ];
    NSLog(@"got string token %@", self.token);
}
這樣一來就會在 console 看到一串的token,屆時再把 self.token 這個傳到 Server 去接,這個部分就留給讀者們去發揮了。咱們下次見。


2012年8月21日 星期二

iOS 與 jQuery Chart API 溝通 - jqPlot

寫程式時總是會遇到需要呈現許多資料的時候,此時就會想說要選用那一種 Chart API 比較好?在寫文章前先給看文章的朋友們建議,如果只是單就呈現 Chart 圖而不需要很常的互動的話,可以選擇幾個 HTML + Javascript 的 Chart API 來用用,簡單而且美觀。可以參考這個網頁介紹的幾個,在這個文章筆者是採用 jqPlot。而如果和 Chart 圖互動很高的話,效能的考量最好用 Native 的 Framework 比如 Core Plot
這篇文章的重點有
  • 自訂 cell
  • web view 呈現 html + javascript
  • NSArray 轉成 JSON String
  • web view 呼叫 javascript function,傳資料給 javascript
  • 動態呈現 Pie Chart
首先來開啟一個 Master-Detail Application 的 Project

命名為 PieDemo

自訂 Cell

我們想要產生的效果如下圖
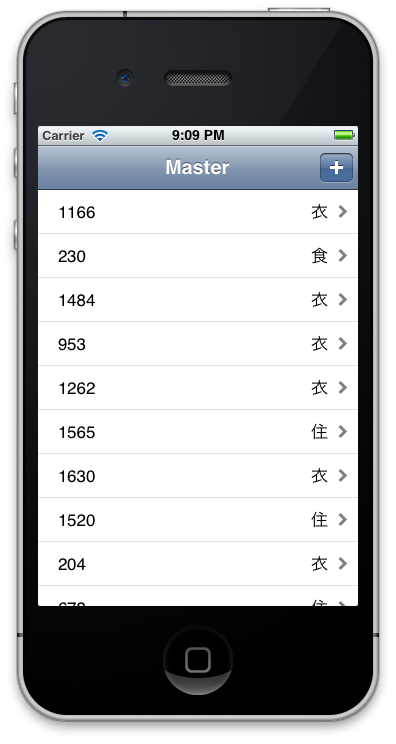
 按下右上的 加號,會隨機產生出數字和類別。而左邊的 Chart 按下去之後會產生各類別比例的 PieChart。
我們先著眼在 MasterViewController.m 加入幾行程式,從 Line 15 開始
@interface MasterViewController () {
    NSMutableArray *_objects;
    NSArray * categories;
 }
@end
新加一個 ivar categories 的 array 在 ViewDidLoad 初始化資料,然後把一個 leftBarButtonItem 去掉。

- (void)viewDidLoad
{
    [super viewDidLoad];
    categories = [NSArray arrayWithObjects:@"食",@"衣",@"住",@"行",@"娛", nil];
  
    // Do any additional setup after loading the view, typically from a nib.
//    self.navigationItem.leftBarButtonItem = self.editButtonItem;

    UIBarButtonItem *addButton = [[UIBarButtonItem alloc] initWithBarButtonSystemItem:UIBarButtonSystemItemAdd target:self action:@selector(insertNewObject:)];
    self.navigationItem.rightBarButtonItem = addButton;
}

接著到 insertNewObject: 隨機產生數字和隨機選一個類別
- (void)insertNewObject:(id)sender
{
    if (!_objects) {
        _objects = [[NSMutableArray alloc] init];
    }
    NSNumber * num = [NSNumber numberWithInteger:arc4random()%2000];
    NSString * cat = [categories objectAtIndex:arc4random()%5];
   
    NSDictionary * content = [NSDictionary dictionaryWithObjectsAndKeys:num, @"amount",cat ,@"cat", nil];

   
    [_objects insertObject:content atIndex:0];
    NSIndexPath *indexPath = [NSIndexPath indexPathForRow:0 inSection:0];
    [self.tableView insertRowsAtIndexPaths:[NSArray arrayWithObject:indexPath] withRowAnimation:UITableViewRowAnimationAutomatic];
}
粗體字是新加的,其他部分是原本 Xcode 產生的。我們把每個 row 需要的資料放在一個 dictionary 裡面,原本的 _object 就是存這些 dictionary。其中筆者用到一個隨機產生數字的 function 為
 arc4random()
再把數值包成 NSNumber 加到 dictionary content 中,也用 arc4random() % 5 隨機選了一個類別加到 content 中。
資料的部分齊全了,接下來看 cell 的部分,這個時候要打開 MainStoryboad.storyboard
選好 Table View 裡的 Cell 為 Custom 如下圖。
 要注意的是 Style 是 Custom,Identifier 是 Cell,大小寫很重要。仔細看一下 Cell 上面有兩個 Label, amount 和 category 是筆者自行從 Library 加上去的。如下。
接下來為這兩個 Label 設定 tag ,amount 的 tag 是 10,cateogry 的 tag 是 11。如下圖。
category Label 請仿照 amount label 的做法把 Tag 設定為 11.
接著就是修改 MasterViewController.m 的程式碼了。找到 tableView:cellForRowAtIndexPath: 改成如下
- (UITableViewCell *)tableView:(UITableView *)tableView cellForRowAtIndexPath:(NSIndexPath *)indexPath
{
    UITableViewCell *cell = [tableView dequeueReusableCellWithIdentifier:@"Cell"];
    UILabel * amount = (UILabel *) [cell viewWithTag:10];
    UILabel * cat = (UILabel *)[cell viewWithTag:11];
    NSDictionary * object = [_objects objectAtIndex:indexPath.row];
    amount.text = [NSString stringWithFormat:@"%d", [[object objectForKey:@"amount"] integerValue]];
    cat.text = [object objectForKey:@"cat"];
//    NSDate *object = [_objects objectAtIndex:indexPath.row];
//    cell.textLabel.text = [object description];
    return cell;
}
利用 viewWithTag: 從 cell 中找到 amount 和 category label 的物件,從 _objects 中讀出相對應的值分別是 amount 和 cat 的 key 再加到 label 的 text 上面。
這樣一來就可以執行玩,按下一開始畫面右上的加號看看,應該會有下圖出現。

web view 呈現 html + javascript

接著我們要在Master 的左邊加上一個 item 名為 Chart,可以直接從 MainStoryboard.storyboard 從 Library 拉一個 bar button item 到 MasterViewController 的 Navigation Bar 上。如下
然後再新增一個 View Controller,拉一個 segue (選擇 push) 從 Chart - Item 拉到新加的這個 View Controller 讀者會看到下圖。

新的 View Controller 也會多了一個 Navigation Bar。接著在 View Controller 上拉一個 web view 上去。如下圖。
 是時候為這個 View Controller 新增一個  Class 命名為 GraphViewController 是繼承自 UIViewController。其中 GraphViewController.h 的程式碼如下
#import <UIKit/UIKit.h>

@interface GraphViewController : UIViewController<UIWebViewDelegate>
@property (weak, nonatomic) IBOutlet UIWebView *myWebView;
@property (strong) NSMutableDictionary * sums;
@end
 其中 IBOutlet  myWebView 是用來連接 storyboard 上面 web view 的元件。sums 這個 dictionary 是用來存 MasterViewController 給的資料。
接著到 GraphViewController.m 的 viewDidLoad 新增程式碼如下
- (void)viewDidLoad
{
    [super viewDidLoad];
   
    NSString * fileURL = [[NSBundle mainBundle] pathForResource:@"graph" ofType:@"html" inDirectory:@"jqplot"];

    NSURL * url = [NSURL URLWithString:[fileURL stringByAddingPercentEscapesUsingEncoding:NSUTF8StringEncoding]];

    NSURLRequest * urlRequest = [NSURLRequest requestWithURL:url];
    [myWebView loadRequest:urlRequest];
    myWebView.delegate = self;
  
}
其中 fileURL 是一個指向 html 檔的位置,筆者等會要把所有畫圖相關的 html javascript 都放到 main bundle 裡 jqplot 這個資料夾下,所以程式碼會寫
[[NSBundle mainBundle] pathForResource:@"graph" ofType:@"html" inDirectory:@"jqplot"];
接著把 fileURL 這個 string 包到一個 NSURL 底下。就用到
[NSURL URLWithString:[fileURL stringByAddingPercentEscapesUsingEncoding:NSUTF8StringEncoding]];
有一個讀者可能會問的問題什麼是 stringByAddingPercentEscapesUsingEncoding ?
對於 browser 的網址列上的字串比如 http://127.0.0.1/?name=michael 會變轉碼成
http://127.0.0.1/%3fname=michael
也就是說 ? 會被轉成 %3F,更多的 precent escape 可以看一下 wiki
最後的步驟就是把 NSURL 包成 NSURLRequest 然後給 myWebView 來讀取。
[myWebView loadRequest:urlRequest];
寫到這裡,先去 download jqPlot 然後把需要的檔案拉到 Xcode 專案去。 下載好解完壓縮會看到一個 dist 資料夾。如下。
我們移掉一些檔案最後剩下如下圖

圖中新增了一個 html 名為 graph.html。來看看它的程式碼
<html>
    <head>
        <script language="javascript" type="text/javascript" src="jquery.min.js"></script> 
        <script language="javascript" type="text/javascript" src="jquery.jqplot.min.js"></script>
        <script type="text/javascript" src="./plugins/jqplot.pieRenderer.min.js"></script>
        <link rel="stylesheet" type="text/css" href="jquery.jqplot.min.css" />

        <script type="text/javascript">
        $(document).ready(function(){
            var s1 = [['Sony',7], ['Samsumg',13.3], ['LG',14.7], ['Vizio',5.2], ['Insignia', 1.2]];
        
            var plot8 = $.jqplot('pie8', [s1], {
                grid: {
                    drawBorder: false,
                    drawGridlines: false,
                    background: '#ffffff',
                    shadow:false
                },
                axesDefaults: {
            
                },
                seriesDefaults:{
                    renderer:$.jqplot.PieRenderer,
                    rendererOptions: {
                        showDataLabels: true
                    }
                },
                legend: {
                    show: true,
                    rendererOptions: {
                        numberRows: 1
                    },
                    location: 's'
                }
            });
        });
        </script>

    </head>
    <body>
        <div id="pie8" class="jqplot-target" style="height:400px;width:300px;">
        </div>

    </body>
</html>
把整包 dist 改名成 jqplot 然後拉到 Xcode 專案,記得選擇 folder。如下圖示。
然後會在 Xcode 專案看到一個藍色的 folder。如下圖
為了要先測試一下 jqPlot 是否正確,先把 MainStoryboard.storyboard 裡有 Web View 的 View Controller 的 class 改成 GraphViewController。如下
接著把 IBOutlet 連結上去。如下
到目前為止可以先執行一下 App 會,按下 Master 左上的 Chart 會看到如下的圖。
 
如果有看到上方左圖就表示 jqPlot 功能正常我們沒有設定錯誤。

NSArray 轉成 JSON String

到了這個階段我們要試著想怎麼把很多筆的資料,在 MasterViewContorller 整合好之後傳給 GraphViewController 的 sums。
在 MasterViewController.m 的開始新增下面程式碼 
@interface MasterViewController () {
    NSMutableArray *_objects;
    NSArray * categories;
    NSMutableDictionary * sums;
}
@end
然後在 viewDidload 初始化 sums 如下
categories = [NSArray arrayWithObjects:@"食",@"衣",@"住",@"行",@"娛", nil];
    sums = [NSMutableDictionary dictionaryWithCapacity:[categories count]];
    [categories enumerateObjectsUsingBlock:^(id obj, NSUInteger idx, BOOL *stop) {
        [sums setObject:[NSNumber numberWithInteger:0] forKey:obj];
    }];
準備好 sums 是一個 dictionary 要傳給 GraphViewController 的目前 sums 的內容是
食=0
衣=0
住=0
行=0
娛=0
在 MainStoryboard 的地方給左上角 Chart 相關的 segue 一個 ID 名為 showGraph。如下圖

然後在 prepareForSegue 的地方新增下列程式碼
- (void)prepareForSegue:(UIStoryboardSegue *)segue sender:(id)sender
{
    if ([[segue identifier] isEqualToString:@"showDetail"]) {
        NSIndexPath *indexPath = [self.tableView indexPathForSelectedRow];
        NSDate *object = [_objects objectAtIndex:indexPath.row];
        [[segue destinationViewController] setDetailItem:object];
    }
    if ([[segue identifier] isEqualToString:@"showGraph"]) {

        [_objects enumerateObjectsUsingBlock:^(id obj, NSUInteger idx, BOOL *stop) {
            NSInteger current = [[sums objectForKey:[obj objectForKey:@"cat"]] integerValue];
            current += [[obj objectForKey:@"amount"] integerValue];
            [sums setObject:[NSNumber numberWithInteger:current] forKey:[obj objectForKey:@"cat"]];
        }];
       
        GraphViewController * graph = segue.destinationViewController ;
        graph.sums = sums;

    }
}
在 segue identifier 的判斷式裡,這裡有一個 enumerateObjectsUsingBlock: 的用意是在 _object 裡的每一筆資料都是
食=1234
衣=3455
食=590
娛=456
於是要把每一筆資料的數值加到 sums 裡面,用
NSInteger current = [[sums objectForKey:[obj objectForKey:@"cat"]] integerValue];
取得某一個分類的值
current += [[obj objectForKey:@"amount"] integerValue];
把在 sums 裡的值和目前值加起來
[sums setObject:[NSNumber numberWithInteger:current] forKey:[obj objectForKey:@"cat"]];
最後還是寫回到 sums 裡面。
run 完所有的 _objects 裡的元素後,sums 的值也準備好了,就利用
GraphViewController * graph = segue.destinationViewController ;
 graph.sums = sums;
傳給 GraphViewController。目光轉到 GraphViewController.m 身上。新增一個 method
-(void) webViewDidFinishLoad:(UIWebView *)webView{
    NSMutableArray * catArray = [NSMutableArray array];
    NSMutableArray * valueArray = [NSMutableArray array];

    [self.sums enumerateKeysAndObjectsUsingBlock:^(id key, id obj, BOOL *stop) {
        [catArray addObject:key];
        [valueArray addObject:obj];
    }];


    NSString * jsonArray = [[NSString alloc] initWithData:[NSJSONSerialization dataWithJSONObject:catArray options:NSJSONWritingPrettyPrinted error:NULL] encoding:NSUTF8StringEncoding];
    NSString * jsonValue = [[NSString alloc] initWithData:[NSJSONSerialization dataWithJSONObject:valueArray options:NSJSONWritingPrettyPrinted error:NULL] encoding:NSUTF8StringEncoding];
   
    NSLog(@"json Array %@", jsonArray);
    NSLog(@"value array %@", jsonValue);
    [myWebView stringByEvaluatingJavaScriptFromString:[NSString stringWithFormat:@"gotData(%@,%@); ",jsonArray ,jsonValue]];
}
裡面筆者打算把 sums 分開成兩個 array 分別是 catArray 和 valueArray 而
[self.sums enumerateKeysAndObjectsUsingBlock:^(id key, id obj, BOOL *stop) {
        [catArray addObject:key];
        [valueArray addObject:obj];
    }];
就是做這件事情。
然後接著就是把 NSArray 物件轉成 JSON String ,我們用的是
[NSJSONSerialization dataWithJSONObject:catArray options:NSJSONWritingPrettyPrinted error:NULL]
是把 NSArray 轉成 JSON 格式的 NSData,然後再用 NSString 的 initWithData:encoding: 來把 NSData 轉成 NSString.
NSString * jsonArray = [[NSString alloc] initWithData:[NSJSONSerialization dataWithJSONObject:catArray options:NSJSONWritingPrettyPrinted error:NULL] encoding:NSUTF8StringEncoding];
 catArray 轉成 jsonArray,valueArray 轉成 jsonValue。接下來的就是把 jsonArray和 jsonValue 那兩個 json 格式的物件利用 web view 的 stringByEvaluatingJavaScriptFromString: 傳給 html 的 javascript 接住。如下
[myWebView stringByEvaluatingJavaScriptFromString:[NSString stringWithFormat:@"gotData(%@,%@); ",jsonArray ,jsonValue]];
這邊可以看到 javascript 承接的 function 為 gotData(),而 jsonArray 和  jsonValue 透過 %@ 方式進入 gotData 裡去了。
所以接下來我們要在 graph.html 新增 javascript function gotData 來接收 web view 給 javascript 的資料。

web view 呼叫 javascript function,傳資料給 javascript

Xcode 打開 graph.html,在 <script> </script> 中新增如下程式碼。
<script type="text/javascript">
            var catArray = "";
            var valueArray ="";
            var pieData = [];
            function gotData(data1,data2){
                catArray = data1;
                valueArray = data2;
            }

</script>
筆者新增三個變數,catArray 用來存 jsonArray 的資料,valueArray 用來存 jsonValue的資料,而pieData 則是用來畫 pie chart 的資料,也是 catArray 和 valueArray 的組合。接著我們看到 gotData這個 function
function gotData(data1,data2){
                catArray = data1;
                valueArray = data2;
 }

在 web view 執行這個 function的時候就會透過 data1, data2 把資料給 catArray 和 valueArray。

動態呈現 Pie Chart

為了要符合 jqPlot 的運作方式,筆者要再新增一個 function 名為 drawPie() 如下
function drawPie(){
                for(var index in catArray){
                    pieData.push([catArray[index],valueArray[index]]);
                }

                var plot8 = $.jqplot('pie8', [pieData], {
                                     grid: {
                                     drawBorder: false,
                                     drawGridlines: false,
                                     background: '#ffffff',
                                     shadow:false
                                     },
                                     axesDefaults: {
                                    
                                     },
                                     seriesDefaults:{
                                     renderer:$.jqplot.PieRenderer,
                                     rendererOptions: {
                                     showDataLabels: true
                                     }
                                     },
                                     legend: {
                                     show: true,
                                     rendererOptions: {
                                     numberRows: 1
                                     },
                                     location: 's'
                                     }
                                     });
            }
這個 function 主要是依照 jqPlot 畫圖的資料格式,之前是
[['Sony',7], ['Samsumg',13.3], ['LG',14.7], ['Vizio',5.2], ['Insignia', 1.2]]
就一個 array 裡面每一筆資料都是只有兩個元素的 array,第一個元素是代表 label 第二個元素 代表數值,所以這邊用
  for(var index in catArray){
           pieData.push([catArray[index],valueArray[index]]);
  }
把 catArray[index],valueArray[index] 組合起來的 array 加到 pieData 裡面,當 index 是所有 catArray 的 index 之後,pieData 就準備好了,就可以直接丟給 $.jqplot 去畫圖。
存檔之後就可以執行看到如下畫面。眼尖的讀者可以看一下有沒有算錯?
一樣地,所有的程式碼放在GitHub