要建立這項服務,開發者必需要有 Server Side Programming 的能力,而 Node.js 可以把學習曲線降到最底,讓我們來看看它神奇的地方。
首先安裝一個叫 node-apn 的 package。老方法用 npm
npm install -g node-apn
npm install -g apn
這樣就安裝好了。程式碼有多簡單呢?
var apns = require('apn');
var options = {
    cert: 'cert.pem',                 /* Certificate file path */
    key:  'key.pem',                  /* Key file path */
    gateway: 'gateway.sandbox.push.apple.com',/* gateway address */
    port: 2195,                       /* gateway port */
    errorCallback: errorHappened ,    /* Callback when error occurs function(err,notification) */
};
function errorHappened(err, notification){
    console.log("err " + err);
}
var apnsConnection = new apns.Connection(options);

var token = "xxxx;oiqwjf;oiwje;foiajw;f";
var myDevice = new apns.Device(token);
var note = new apns.Notification();
note.expiry = Math.floor(Date.now() / 1000) + 3600; // Expires 1 hour from now.
note.badge = 1;
note.sound = "ping.aiff";
note.alert = "You have a new message";
note.payload = {'messageFrom': 'Caroline'};
note.device = myDevice;

apnsConnection.sendNotification(note);就這樣不到 30 行,更詳細的文件可以參考這裡 node-apn,就可以從任意可以執行 Node.js 的電腦送訊息給 iOS 的 App。
其中有一些準備動作第一次要完成,比如 cert 和 key 的 file ,從 Apple iOS Portal Download 下來之後,要自行轉檔才可以得到,再來就是 token 某個 iOS App 會去 Apple 某一個 token ,代表著這個 App ,Push Notification 要和這個 Token 綁在一起,當這個 Push Notification 到達手機時,iOS 系統才會知道要送給那一個 App。
我們從上方一步一步來看,首先看到
var apns = require('apn');
var options = {
    cert: 'cert.pem',                 /* Certificate file path */
    key:  'key.pem',                  /* Key file path */
    gateway: 'gateway.sandbox.push.apple.com',/* gateway address */
    port: 2195,                       /* gateway port */
    errorCallback: errorHappened ,    /* Callback when error occurs function(err,notification) */
};
function errorHappened(err, notification){
    console.log("err " + err);
}

var apnsConnection = new apns.Connection(options);解說到這先停一下,看要如何來產生 cert.pem 和 key.pem 這兩個 file.
進入 iOS Developer Portal 的時候先選到某一個 App IDs 的 Configure. 如下圖


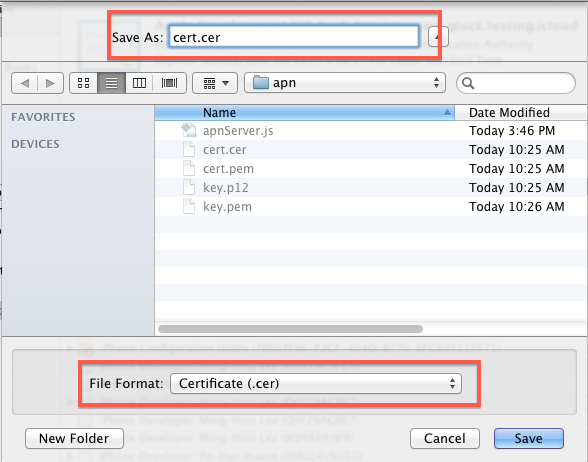


這樣一個 key.pem 和 cert.pem 都準備好了。回到 apnServer.js 看看$ openssl x509 -in cert.cer -inform DER -outform PEM -out cert.pem $ openssl pkcs12 -in key.p12 -out key.pem -nodes
var token = "xxxx;oiqwjf;oiwje;foiajw;f";
var myDevice = new apns.Device(token);
var note = new apns.Notification();
note.expiry = Math.floor(Date.now() / 1000) + 3600; // Expires 1 hour from now.
note.badge = 1;
note.sound = "ping.aiff";
note.alert = "You have a new message";
note.payload = {'messageFrom': 'Caroline'};
note.device = myDevice;

apnsConnection.sendNotification(note);最後我們來看一下 iOS App 怎麼取得專屬於自己的 token?
在任何的 App Source 的 AppDelegate.m 裡如下新增。
- (BOOL)application:(UIApplication *)application didFinishLaunchingWithOptions:(NSDictionary *)launchOptions{
    [application registerForRemoteNotificationTypes:
     UIRemoteNotificationTypeAlert | UIRemoteNotificationTypeBadge | UIRemoteNotificationTypeSound];
    self.window.backgroundColor = [UIColor whiteColor];
    [self.window makeKeyAndVisible];
    return YES;
}

- (void)application:(UIApplication *)application didRegisterForRemoteNotificationsWithDeviceToken:(NSData *)deviceToken {
    NSString * tempToken = [deviceToken description];
    self.token = [tempToken stringByReplacingOccurrencesOfString:@"<" withString:@""];
    self.token = [self.token stringByReplacingOccurrencesOfString:@">" withString:@""];
    self.token = [[self.token componentsSeparatedByString:@" "] componentsJoinedByString:@"" ];
    NSLog(@"got string token %@", self.token);
}
作者已經移除這則留言。
回覆刪除請問這個作法跟用php,java,c#透過gateway.sandbox.push.apple.com 發notify有何不同呢
回覆刪除